Page Speed Improvements: Image Size & SEO
Roy Bielewicz
Search engine optimization can sometimes be daunting, and a little overwhelming, especially for people who aren’t “technical”, and don’t market for a living. You can sometimes see eyes start to glaze-over when terms like “alt”, “meta”, and “canonical” get thrown around in a planning session. But not everything involved in SEO is technical, and there’s a lot that you can do to optimize your site, without the need for an agency or an SEO expert.
You’ve probably heard that site speed is an increasingly important factor in organic search rankings. Google has not only made it clear that this is a “signal” used by its algorithm, but they’ve provided several tools that you can use to measure your site speed and the health of your site (more on that later). You may have also heard a lot of technical mumbo jumbo about Gzip compression, minifying CSS and JavaScript, removing render-blocking JS… Did we lose you yet?
Sure, all of those things are important. Very important. And you’ll want to engage an SEO expert to help with those. But what can someone who’s not very technical do to help with site speed, you ask? Well one of the largest offenders when it comes to slowing down how quickly a given page loads are all of the beautiful images that you’re using for your header, your product images, your blog images, etc. Just one of those images can easily surpass 1MB, so when you add three, four, or five of those images to a page, you’re quickly surpassing Google’s recommended maximum page size of 5MB.
How Big Is It?
There are a number of ways to determine how slowly your site is loading, or how large your images are. A couple of the best ways to monitor your site’s load speed are:
For individual images, you can check manually, by looking at the file size if you download it to your computer, or by using any of a number of Chrome plugins, which will also provide information about total file size.
Compression Options
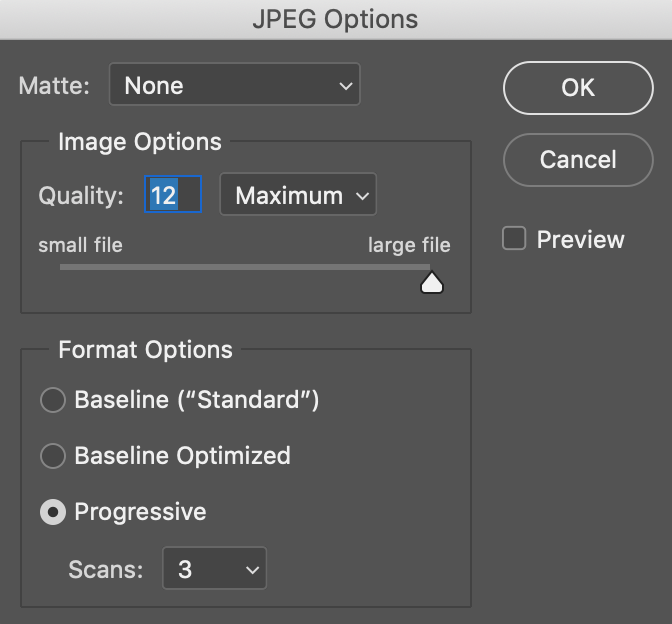
Many designers will already compress images, particularly JPEGs, using Adobe Photoshop’s built in compression tool. The problem with depending solely on this tool is that as you reduce the quality slider and thus the image file size, you… well, you reduce the quality.
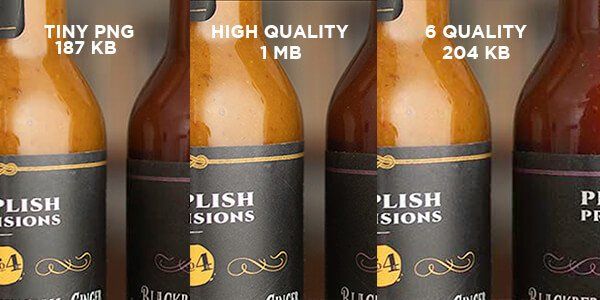
For instance, a standard JPEG that is 1529 x 1147 pixels, at a standard 72 dpi, is 1MB when saved at the maximum quality setting. That’s a pretty standard ratio for an image out-of-camera, and not too unusual for a hero image on a homepage.
Most designers know that that size is pretty large for a website, and the common tactic is to reduce the quality slider. If you were to take the quality to 6, it would reduce the size of the image (in this case to 204KB), which is a significant size reduction. However, by reducing the quality, you’re adding pixelation, sometimes banding, and even color shifts in your image. Not a great option for a featured image.
However, if you use a compression tool, you can strip unneeded metadata from your image, without impacting the quality. In this scenario, we took the same image, compressed it using TinyJPG/TinyPNG, and ended up with a file that was 187KB, which is smaller than the image produced by lowering the quality slider, but without noticeably impacting the image.
There are a number of free compression tools available, some of which will compress PNG and JPEG images slightly better than others. We use a paid version of TinyJPG/TinyPNG because it has a handy Photoshop plugin. In no particular order, here are a few you may want to try:
Summary
Ok, so going back and compressing images for an already existing website can be kind of a time suck. And depending on the size of your site, particularly for retail sites, it can more than just a time suck, but a major investment in resources. But is it worth it? It most definitely is. Reducing the size of your images has a huge impact on your page load speeds, which impacts not only your user experience, but your organic search rankings. And of all the tactics for improving SEO, it’s one of the most approachable for the average SEO layperson. It doesn’t take expensive tools, it doesn’t need specific know-how, and hey, it’s something that would be a great project for an intern, at least on a small scale.
If you’d like to learn more about how you can improve your site’s performance and rankings, contact us today!
Contact Us


